6/22/12

Tomatoes, cucumbers and sweet peas, Oh My!

So here are the updated photos of the garden taken yesterday. All the rain we've gotten this week has helped keep everything growing well and also green the lawn back up. The cabbage, broccoli and cauliflower have really taken off now too.


The empty rows in this bed are were the sweet corn has been re-planted. Keeping my fingers crossed that it comes up this time. I haven't tried growing corn in the square foot garden before but figured it didn't hurt to try. It's a 65 day variety so it won't get too big. The Space Master cucumbers are growing well and have started to climb their fence.

The tomatoes are growing well! I pinched off all the suckers today. By next week they should be big enough to start tying up on the fence.


The peppers have flowers on them and the carrots are looking good so far too. Now the Blue Lake bush beans I planted on the other side of this bed were growing really nice, until a furry little visitor came and nibbled on them.


Grrr... really hoping we can get rid of these rabbits!! Funny how they haven't touched the carrots!

Finally, the sweet peas are coming in still.  Have to get the kids out there to pick some more soon!


Next time I'll give and update on the DIY compost tumbler we built!


Wanted to leave you with a shot of some of the lilies blooming in the perennial garden right now.

6/21/12

How does your garden grow?

Our newly built raised beds were put into place back in May. We bought compost from Hsu's greenhouse supply in Brokaw and added peat moss and vermiculite to the mix and filled them up.


Dale cut some lath strips to mark out the square feet then we also added some T-post and fencing. On one bed the fence is along the 4 foot end as a trellis for the cucumbers to grow on.


The other bed has the fence going down the 8 foot center. My tomatoes were planted in two rows along both sides and will be tied up to the fence for support.


These pictures were from June 4th. I'll post new ones tomorrow to show how well everything is growing. The tomatoes aren't planted yet in these either. I had to re-plant the sweet corn this week as the first planting didn't come up. I used seed left over from last year so that didn't help. I also tried some older sunflowers and they didn't come up.


 These are the sweet peas I started under the plastic in the hoop house. They did really well and we are now harvesting lots of peas! The kids love to go out and grab them. On the right you can see the Russian kale is doing well too. We have had a rabbit problem though and the tops of most of the beets and chard have been nibbled off. We've been setting the live traps and doing some target practice on the ones we happen to see.

So far I really like the new taller beds. They are double the height/depth of my original raised bed and are easier to tend to. I've hardly had any weeds either!

6/20/12

DIY rain barrel

Up until this week June had been a very dry month here in Marathon County. In the last few days we've been blessed with a few inches of rain. We had our rain barrel all set up in time and just one inch of rain filled it right up!

Here's our set up:

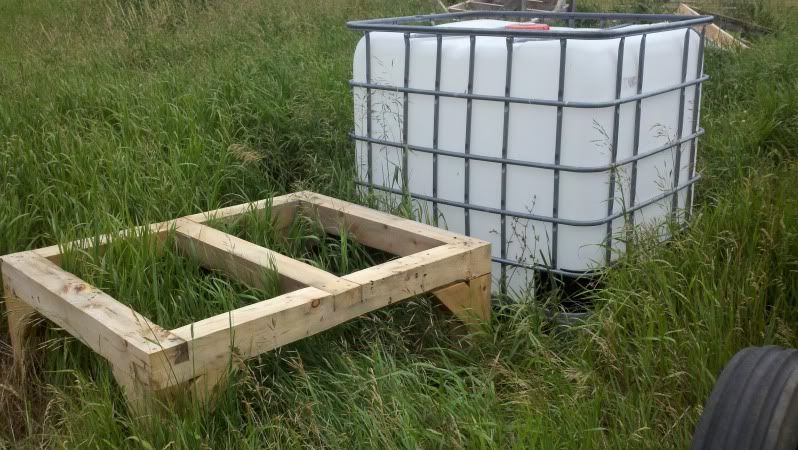
We started with one IBC tote that Dale got from where he works. You can also pick these up on Craigslist pretty often. Before using it we rinsed it well and used a green cleaner to get out any residue left over from the product is once held. We also had a great heavy duty wood stand made by my step-father to put it up on.


I put a couple of coats of a clear wood water sealer on the stand so it will last for a long time. The tote itself we took out of the metal frame it's in. It comes out really easy. To help prevent algae growth once the IBC tote is filled with water, I spray painted it dark grey to keep the light out. I used one of those paints they make just for plastic and I highly suggest getting a spray can gun tool. It makes the job so much easier! I picked the color so it would blend in with our pole building and the chicken coop it will be next too.


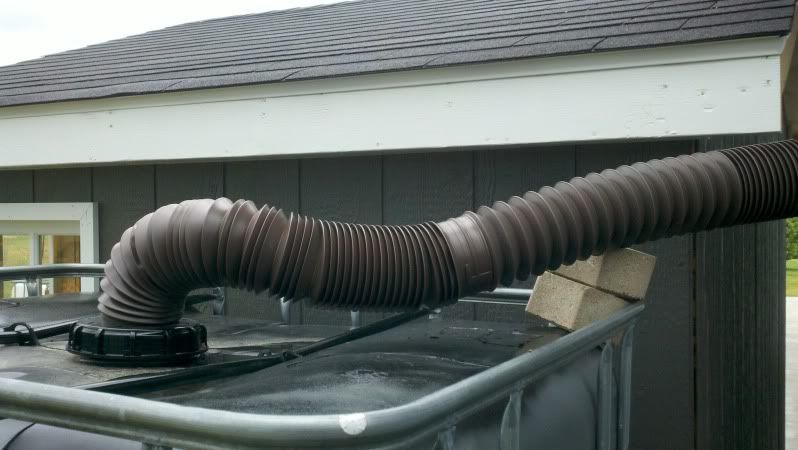
When we had the gutters installed a few weeks ago I asked them to leave an elbow at the height where the tote would be later. From that we used two flexible downspout extensions to tie into the top of the tote. Dale used a 3" circle cutter on his drill to cut a hole into the cap to fit the downspout into.


The two pavers are there to support the plastic downspout. We wanted to leave enough room to walk through behind the coop and between the pole building and that left the downspout with some sag. During a heavy rain we were afraid the added weight might add too much for it so the pavers are helping hold it up for now.


A few fittings from the plumbing department were needed to get the connections all set up and now we are in business! One side of our 40 x 32 pole building's roof runs off into this rain barrel. A half an inch of rain filled it up half way. It can hold 300 gallons total. Dale also drilled several over flow holes in the cap so the extra water just flows up and over the top. We re-used 9 patio blocks to set and level the rain barrel on and also so the over flow water won't make a mess around the base.

So there you have it!! For under $75 we have a great DIY rain barrel made from an IBC tote!!

I've used it several times already to fill up the chicken's water and I was surprised that the water hadn't really warmed up much yet either.

6/19/12

More progress on the new chicken coop

It's been quite some time since I did an update on the chicken coop construction. Well, things are looking great! All 4 windows are in. The siding got two coats of paint. The trim is almost all up and painted and it's been moved into the final position now that the concrete has cured.


You are looking at the east facing side with the two sliding windows and the chicken pop door. Our DIY rain barrel is just to the right of the coop catching water from our down spout. This is the side of the coop that the 10 x 10 run will be attached to.


This is the south facing wall. Still need to build a door. The inside has one coat of primer so far, with one more to go before the final coat of white.

I'm still waiting on getting my Swedish Flower Hen chicks. It will  be a couple of weeks so there's lots of time to finish up work on the new coop.

6/18/12

Growing up and moving out

The turkeys are 4 weeks old now and getting big. It was time for them to move out of their brooder in our pole building and out into their coop. They made the trip out yesterday along with the 4 broilers that are keeping them company.


We had let the grasses and weeds grow up in the coop from last year so now they have some greens to eat and scratch around in. One of the turkey poults didn't make it. It had been showing signs of splayed leg and after treating it for over a week it just wasn't improving and had to be culled. The other two are doing great!


We switched them over to an organic 28% turkey feed a couple of weeks ago. We are very lucky to have a feed mill in town here that mixes their own organic feeds. Yes it's  more expensive than conventional feed but if we are going to raise our own turkeys why not do it as natural as possible.

There's been lots of other things going on that I need to post updates on so stay tuned!
Better yet subscribe to my blog and you won't miss a thing!

Popular Posts